Showing posts with label Linux. Show all posts

Monday, August 6, 2012

What’s New In OS X 10.8 Mountain Lion? [Review]

Mountain Lion, the latest installment in Apple’s OS X, was released yesterday and brings the version to OS X 10.8. Available to download from the Mac App Store for the promised $19.99, it is a 4GB download and boasts some 200+ features as per Apple’s official page. We aren’t going to sit and count off each one on our fingers, but here’s a look at what’s new and noteworthy in the OS. Apple hasn’t just thought of what new features users need, it’s also executed them well keeping in mind the smooth UI it is well known for developing and maintaining.  The new OS integrates better with its mobile counterpart, iOS, and even borrows a couple of features from it. Apps have been added or renamed to create a better, more integrated feel between Mac and iOS devices but with Apple, it is safe to say that no functionality has been lost. Twitter has been integrated and the promised Facebook integration will arrive later this year in Autumn. Some features of the OS, though not many, are tied to iOS 6 and while they are still there, will not be fully functional until the latest version of iOS is released to the masses.

OS-X-Mountain-Lion

Finder

Finder, the file browser in OS X, is pretty much unchanged except for the addition of two items. A share button which is a recurring addition to most things in OS X and the ability to encrypt drives from the the right-click context menu. The share option is a button added to the toolbar in Finder and it allows you to share a file or picture on Messages or Email it. This is going to make adding files to emails a lot faster and sharing a file or photo via the Chat client will be similarly convenient.
mountain lion Finder
Other visual enhancements to the Finder include showing progress on the file icon when a file is being downloaded from a server or a drive. The progress bar will be similar to the one you see on the Launchpad icon when an app is downloading from the Mac App Store. For those of you who don’t like the order of the items in the sidebar, Finder will now let you change it as per your liking. One small step for man?

Safari 6.0

The latest version of Safari finally merges the URL bar and the Search bar into one. Sharing as a basic function has been integrated in Safari as well as allowing users to share their searches on Twitter, Mail and Messages.
share Safari
Whether you looked something up on Google or browsed to a particular page on a website, the share button will copy the URL of the search and let you share it via Email, Tweet it or send it as an IM. This should make it easier to share those Easter Eggs you find on Google.
Safari tweet

Mail

Mail looks and behaves pretty much the same as it did before with one slight enhancement that might turn out to be a real winner. You can now mark contacts as VIPs. Anyone who sends you important emails frequently like your boss, a team member or your Mom, will be given more importance and the feature will also act as a quick search filter for quickly viewing emails from that one contact.
Mail VIP

Calendar

Again only small changes here and nothing noteworthy to speak of. A sidebar has been added to make it more convenient to switch to another month and to easily switch between the different calendars you’ve added. Changing the date of an event has been made easier with a date picker. The date picker opens when you click the date on an event. You can modify this date for an existing event or add the date to an event that lacks one.
calendar Mountain Lion

Notes

The Notes app is one of the new ones in Mountain Lion. It is the same Notes app that you use on your iOS device and it has been ported to Mac as a default app. The wisdom behind it is of course to sync your notes, whether made on the desktop (Mac) or on a mobile device (iPad or iPhone) and ensure they are available on both. Many users complained that Stickies did not support this and there were a few apps available in the Mac App Store that brought the functionality to both devices. The Notes app does the same via iCloud. The interface is almost exactly the same as the one on iOS but since a desktop gives you more flexibility, the Notes app in Mac lets you create folders and add links and photos to a note. Notes can be pinned to your desktop and in effect, turn into stickies as well. The app has reasonable text formatting tools. Double click a note to open it in its own window i.e., in stickie mode. Click the side bar to add a folder or just hit Shift+Command+N.
Notes

Reminders

Reminders is yet another leaf taken from the books of iOS. The app is an almost exact replica of the iOS app with a few liberties taken since it is on the desktop and therefore has room to do more. In this case you can add lists of your own. On iOS you were limited to Reminders and Completed but the Mac version gives you complete freedom to add as many lists as you like and subsequently add reminders to those lists.
Reminders

Game Center

Game Center is yet another app take from iOS. Sign in with your Apple ID and stats from games you’ve played on your iOS device will be listed as well as stats from OS X games that support Game Center. There aren’t very many of those just now but you can expect the number to increase. Seems as though Apple is interested in establishing itself as a gaming platform too, or it might just be another step in the unification with iOS.  Only time will tell how developers will make use of it and how far it will go.

Contacts & Messages

Address Book has been renamed to Contacts and the new feature here is the groups you can create. Contacts has been integrated all across the OS and will make it easier for you to start group chat sessions in Messages app which itself pretty much the same as what it was when we reviewed it in Beta. The integration of Contacts here means that no matter where you have information coming in from i.e. an email, a Twitter ID or a Phone number, Contacts is going to gather it all in one place. It’s the one app to bind them all.

Preview & TextEdit

Sharing documents on Messages or adding them to emails and sharing pictures to Flickr, Facebook and Twitter is now a one button effort in Preview. Adding notes is much easier but perhaps what is the best feature added to this app is the ability to fill PDF forms. Finding a decent tool for filling in a PDF form isn’t easy and Apple obviously thought it was a basic enough need to include it in the Preview app. Take a PDF form, any type and open it. Preview will detect fields like text input areas and check boxes. Clicking on said fields will allow you to input data in them. You can check option boxes and radio buttons, the whole deal.

TxtEdit is yet another app that Apple has revamped and the changes are excellent if you plan on using iCloud. The home screen of the app is now divided into two tabs that allow you to access documents stored on your hard drive or access and upload them to iCloud. Adding a file to iCloud is as simple as dragging & dropping it. You can create a blank document as well and save it to cloud as opposed to your hard drive. As a bonus feature, you can now pinch to zoom in on text. I would personally like to see this particular gesture implemented all across the OS.

The divided tabs allow you to access iCcloud and your hard drive from the same place. The unification in TextEdit will lend a lot of convenience to users. Instead of having to visit a different folder on your drive (like with Dropbox) you have the choice to toggle between the two from within the app. It’s the kind of integration you can expect only at OS level and Apple seems to have taken great advantage of it. Even if you don’t think the new OS is more than bells and whistles (and there are users who do think that) the sheer genius behind this integration is admirable.

Launchpad & Dashboard

In Launchpad, you can now search for apps by typing their name in the search bar. The search bar appears across all the pages your apps are spread out on and searches as you type for apps that match. This is useful both for finding an app when you aren’t sure what it was called or when you have so many of them installed that you’re likely to overlook it in a manual search.

The same search feature has been implemented in Dashboard where you can also group widgets into folders. This is surprising since the number of Mac users unhappy with the Dashboard is more than those who are happy with it yet, Apple not only kept it around but gave it an iOS make-over and a new default background which kind of makes me miss the old one. Click and hold a widget and they start to quiver like the apps in Launchpad and a black cross appears over the ones you can delete. Finding new widgets has also been made easier with a little button at the bottom of the Dashboard that says More Widgets.

System Preferences

Lots of changes here; you will notice Notifications, Mail, Contacts & Calendars and Dictations & Speech as new items. If you dig deeper, you will see several new things in Security & Privacy.  Each of these items are integrated system wide and are therefore managed from a central place in the OS.

Notification Center

This is yet another one of the more popular features in iOS; a notification system that integrates messages from apps. Whether it’s Apple’s answer to the popular Growl app or is just one more way to make OS X more like its mobile cousin, the notification center is likely to be well received. In addition to providing you notification from apps like Calendar, Reminder, Notes, Messages, Chrome, it also allows you to connect your Twitter account, send out Tweets and alerts you when you are mentioned in a Tweet or when you receive a Direct Message. You’ve got your two different styles for notifications as well, same as in iOS and there is the option to turn them off for a single app.

Like the notification center in iOS, you can choose to manually allow apps to send you notifications from Preferences. Any app can be added or removed. Apps that don’t support Mountain Lion will still use Growl so don’t think it’s a good idea to remove it just now and rely completely on the default notifications. A notification panel opens at the right of your screen when you click the newly added list like button at the right on the Menu Bar. This button which sits next to Spotlight lets you open/close the notification panel which works exactly the same way as it does in iOS.
 

iCloud

You will find iCloud integrated in just about every app possible; Mail, Contacts, Reminders, Notes, Safari, TextEdit, everything! The point is to give users a central place for storing everything ensuring that their data is available no matter where they go. When you first boot into Mountain Lion, you will have the choice to sign in with your Apple ID, and at the same time, enable iCloud. If you choose to skip the step, you can sign in and selectively enable apps from System Preferences.

Security & Privacy

Drive encryption has been added, as have restrictions for apps that have not been downloaded from the Mac App store. This is one feature that will have you drooling rainbows although, considering you have only one consolidated hard drive, encryption can take a while. Our’s took something like 8 hours to complete and is 500GB in size (not very large, just sufficient). All four tabs in this preference demand attention. You can set up encryption, from FireVault, manage which types of apps should be allowed to run from the General tab, exercise some serious control over the firewall from Firewall and lastly, manage which apps are using your location from the Privacy tab.

Firevault, which is easily the one feature in this preference that will command your attention, allows one or any number of users to decrypt the drive. Unlike BitLocker on Windows, the decryption key isn’t saved on your system. You have to write it down or use some other means of preserving it. You can choose to save it with Apple if you like and it can be recovered by answering three security questions. There is the dire warning that if you lose your key, forget you password and have decided not to save it with Apple, you can forget about ever accessing your Mac HD again.  Users can later be authorized to unlock the drive from their own accounts but you will need to enter their password first. Firevault can be turned off at any time.

Twitter

As mentioned above for several apps, Twitter is now everywhere in OS X. You can share pictures and web searches as well as send tweets all from Mountain Lion’s default feature. To link your Twitter account, visit Mail, Contacts & Calendars in System Preferences. Options for sharing on Twitter are present in Preview, Safari, TextEdit and Finder. So far. you can Tweet with your location and if you want to share an image, you will have to open it in Preview first and use the Share button to share it to Twitter. The only deal breaker is if you don’t share a link from Safari, i.e., you use a different browser and copy and paste the link to the notification centre there is no URL shortner associated with the service. Developers can take note and perhaps a little app will appear shortly for it in the Mac App Store. Of curse, with all this Twitter integration, and almost enough features for users to want to abandon their Twitter Clients, one might wonder that there isn’t an easy way to follow your feed. While it would be more than intrusive to have them pop-up as they come, it is the only thing that might keep you from switching completely to tweeting from your OS.

Screensavers

The Screensavers in Mountain Lion seem to have a new groove too. You can now have several images appear in different layouts and select a folder where the images will be pulled from. Additional options include typing a custom message, viewing art from iTunes or learning a new word everyday by selecting the Word of the day option.

In Summary

  • Facebook integration, something that seems very exciting once you give Twitter a go; will sadly arrive in Autumn.
  • Not all, but some features that tie the knot between iOS and OS X will be available only when iOS 6 rolls out, and this means a little less syncing and not as much universal iCloud support as you could hope.
  • Yes, OS X is looking more and more like iOS; embrace it because it isn’t bad at all. Apple isn’t likely to retract it, but even if you do fail to get used to it, you can always count on there being an app to help you with that.
  • Notification Centre is excellent and might just change your life. It is smart and knows when to pop up and when not to. More importantly, it comes with a flip switch for turning it off.
  • Sharing & syncing are an integral part of Mountain Lion so you should actively be looking for the share button in the default apps at the very least. Hopefully as new apps arrive in the Mac App Store, you will find better use of the feature.
  • You can now view the Mac App store in full screen mode.
  • Dictionary has been improved and new ones have been added.
  • QuickTime X has a better encoder and, as you can guess, has the same sharing options you will see in the default apps.

Conclusion

Mountain Lion did not bring a huge UI overhaul to the table, but there are certainly some new elements to the interface. Some might say the new features are really just something that should have been there to begin with, but that isn’t true for all of them. iCloud is going big as far as OS X is concerned. Bear in mind that you might not get a complete feel of what the OS is supposed to be like given most of us do not have iOS 6. Hopefully, with additional updates, the two will mesh well and give a better user experience than ever before. The new features open up new development prospects for apps while making a few of them obsolete. Perhaps the best thing that can be said for OS X Lion fans at this point is that none of Lion’s features have been axed. Some things have been renamed, but that really is as far as it goes, and settling into this new version should prove to be simple for most. Let us know what you think of Mountain Lion and stay tuned for more.
 
Thank you for sharing addictivetips

Wednesday, April 4, 2012

Become a Linux Terminal Power User With These 8 Tricks

bash tricks header
There’s more to using the Linux terminal than just typing commands into it. Learn these basic tricks and you’ll be well on your way to mastering the Bash shell, used by default on most Linux distributions.
This one’s for the less experienced users – I’m sure that many of you advanced users out there already know all these tricks. Still, take a look – maybe there’s something you missed along the way.

Tab Completion

Tab completion is an essential trick. It’s a great time saver and it’s also useful if you’re not sure of a file or command’s exact name.
For example, let’s say you have a file named “really long file name” in the current directory and you want to delete it. You could type the entire file name, but you’d have to escape the space characters properly (in other words, add the \ character before each space) and might make a mistake. If you type rm r and press Tab, Bash will automatically fill the file’s name in for you.
Of course, if you have multiple files in the current directory that begin with the letter r, Bash won’t know which one you want. Let’s say you have another file named “really very long file name” in the current directory. When you hit Tab, Bash will fill in the “really\ “ part, since the files both begin with that. After it does, press Tab again and you’ll see a list of matching file names.

Continue typing your desired file name and press Tab. In this case, we can type an “l” and press Tab again and Bash will fill in our desired file name.
This also works with commands. Not sure what command you want, but know it begins with “gnome”? Type “gnome” and press Tab to see a list.

Pipes

Pipes allow you to send the output of a command to another command. In the UNIX philosophy, each program is a small utility that do one thing well. For example, the ls command lists the files in the current directory and the grep command searches its input for a specified term.
Combine these with pipes (the | character) and you can search for a file in the current directory. The following command searches for the word “word”:
ls | grep word

Wild Cards

The * character – that is, the asterisk – is a wild card that can match anything. For example, if we wanted to delete both “really long file name” and “really very long file name” from the current directory, we could run the following command:
rm really*name
This command deletes all files with file names beginning with “really” and ending with “name.” If you ran rm * instead, you’d delete every file in the current directory, so be careful.

Output Redirection

The > character redirects a command’s output to a file instead of another command. For example, the following line runs the ls command to list the files in the current directory and, instead of printing that list to the terminal, it prints the list to a file named “file1” in the current directory:
ls > file1

Command History

Bash remembers a history of the commands you type into it. You can use the up and down arrow keys to scroll through commands you’ve recently used. The history command prints a list of these commands, so you can pipe it to grep to search for commands you’ve used recently. There are many other tricks you can use with Bash history, too.

~, . & ..

The ~ character – also known as the tilde – represents the current user’s home directory. So, instead of typing cd /home/name to go to your home directory, you can type cd ~ instead. This also works with relative paths – cd ~/Desktop would switch to the current user’s desktop.
Similarly, the . represents the current directory and the .. represents the directory above the current directory. So, cd .. goes up a directory. These also work with relative paths – if you’re in your Desktop folder and want to go to the Documents folder, which is in the same directory as the Documents folder, you can use the cd ../Documents command.

Run a Command in the Background

By default, Bash executes every command you run in the current terminal. That’s normally fine, but what if you want to launch an application and continue using the terminal? If you type firefox to launch Firefox, Firefox will take over your terminal and display error messages and other output until you close it. Add the & operator to the end of the command to have Bash execute the program in the background:
firefox &

Conditional Execution

You can also have Bash run two commands, one after another. The second command will only execute if the first command completed successfully. To do this, put both commands on the same line, separated by a &&, or double ampersand.
For example, the sleep command takes a value in seconds, counts down, and completes successfully. It’s useless alone, but you can use it to run another command after a delay. The following command will wait five seconds, then launch the gnome-screenshot tool:
sleep 5 && gnome-screenshot

Do you have any more tricks to share? Leave a comment and help your fellow readers!

Saturday, February 4, 2012

Optimize Your Caching Scheme to Eliminate “Too many links” Errors on Linux

Hello there! If you are new here, you might want to subscribe to the RSS feed to receive updates.
Say you have an application running on a Linux server using the ext2 or ext3 file systems. You set up a caching scheme in your application to store files like so:
/cache/stamps/1/main_content.cache
/cache/stamps/1/comments.cache

/cache/stamps/2/main_content.cache
/cache/stamps/2/comments.cache

/cache/stamps/3/main_content.cache
/cache/stamps/3/comments.cache
...
Eventually, you’re going to run into a problem: Your caching will stop working since your application won’t be able to write to the “stamps” directory any more. Instead, you’ll get an error message like this:
Couldn't create cache directory: /stamps/41134/main_content (Too many links - /var/www/your-app/tmp/cache/stamps/41134)
At that point, you’ll try to search for “too many links”, and probably you won’t find much information that is actually comprehensible to normal human beings. Fortunately, it really is quite simple to repair once you understand what’s going on.

Wikipedia on ext3:
Since ext3 aims to be backwards compatible with the earlier ext2, many of the on-disk structures are similar to those of ext2. Because of that, ext3 lacks a number of features of more recent designs, such as extents, dynamic allocation of inodes, and block suballocation.[9] There is a limit of 31998 sub-directories per one directory, stemming from its limit of 32000 links per inode.[10]
As I understand it, this is what is happening: Each subdirectory in a Linux parent directory contains 2 links: “.” and “..” ext3 can have 32,000 links per inode, but you have to subtract 2 for “.” and “..” – which gives us 32,000 – 2 = 31,998.
“..” is actually a link back to the parent directory (as in “cd ..” to go up one directory). So in our example above, when our /cache/stamps/ directory hits entry number 31999 (/cache/stamps/31999/...), we’ve got big problems. The number of links (“..”) from each numbered subdirectory back to the “stamps” parent directory has now exceeded the maximum allowed by the file system. Oops!
At the very least, we now know one thing for sure: You can’t have more than 31,998 subdirectories in any given directory on an ext3 file system.
Of course, you could just put ALL your cache files into one directory like /cache/stamps/, and forget about all this subdirectory nonsense. That would work a little better, but it isn’t terribly wise in terms of file system performance. Imagine the file system having to find one file in a directory with thousands and thousands of cache files! Bad juju.
You could also simply implement cache expiration via a cron job. The cron job would run a script that would just expire any cache files older than a certain time/date, or perhaps it could get the id of the newest stamp, and then expire all cache files than are not within, say, 10,000 of the latest id number in your stamps table. In both cases, a large number of users on your site may mean that your expiration script won’t run soon enough, and your app will still be back to the same old “Too many links” error. At that point, your caching scheme becomes useless for any stamps that don’t already have cache files, and your site may slow to a crawl anyway! Also bad juju…
If you ask me, systems that expire cache files after a certain period of time even if the content hasn’t been updated are terribly stupid. Once a cache file is generated, it shouldn’t be touched unless the content is updated or deleted. That is the best way to achieve maximum performance for the end user. Besides, why make your server regenerate cache files when it doesn’t have to?!
What to do?
The solution is actually rather clever, and it is apparently used by the likes of Wiki software and postfix.
I’m going to give the solution in Ruby, but it can be implemented just as easily in PHP or any other language.
In order to maximize file system performance and eliminate the 31,998 subdirectory bottleneck, we’re going to create a whole boatload of nested subdirectories in which we put our cache files. This may seem counterintuitive, but bear with me.
First, we use an identifier to generate an MD5 hash. For the stamp with id=31999, we could simply generate the MD5 hash of 31999. Each MD5 hash will consist of 16 bytes of data in hexadecimal format (i.e. 32 characters, each with a value of 0, 1, 2, 3, 4, 5, 6, 7, 8, 9, a, b, c, d, e, or f).
MD5(31999) = 5547d0f7f6110b2d0572695a61bfdfea
Next, we change our hash into a directory path 16 levels deep, like so:
55/47/d0/f7/f6/11/0b/2d/05/72/69/5a/61/bf/df/ea
We can then use this path to store our cache files. To continue with our stamps example, the path for the cache files for the stamp with id=31999 would be:
/cache/stamps/55/47/d0/f7/f6/11/0b/2d/05/72/69/5a/61/bf/df/ea/
instead of:
/cache/stamps/31999/
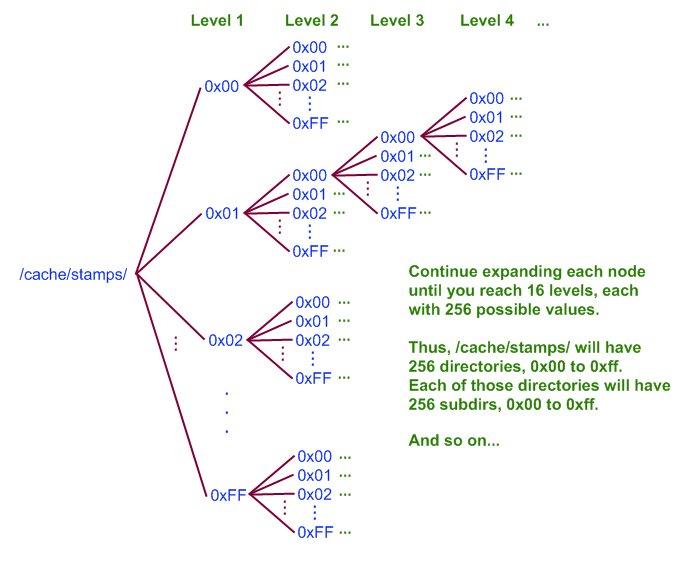
Why are we doing this? Well, we don’t want to have ANY directory with anywhere near 31,998 subdirectories. Using the scheme above, each stamp’s cache files will be stored in a subdirectory of /cache/stamps/ that is 16 levels deep. Each of those 16 directories has 256 possible subdirectories itself, from 0×00 to 0xff. Since none of the nested subdirectories will have more than 256 subdirectories themselves, our system will be far, far away from the 31,998 subdirectory limit. And, instead of being limited to only 31,998 stamps, we can now store cache files for 25616 stamps, or 3.403 × 1038. That’s a LOT of stamps!
If that didn’t make much sense, maybe this flowchart will help:
Click to Enlarge
Click to Enlarge
The only requirement we now have is that whenever we’re generating or reading a cache file, we have to be able to find the appropriate path to get to the right cache files. In our original scheme, we just used the stamp’s id number. Now, all we have to do is write a simple function that will take the stamp’s id number, use it to generate an MD5 hash, and then break up the hash into a 16-level deep file system path. In Ruby, you can do this like so:
require 'openssl'

def get_cache_path(id)

# OpenSSL's MD5 algorithm is 10 times faster than Ruby's!!
the_hash = OpenSSL::Digest::MD5.hexdigest("--stamp--#{id}--")
return the_hash.scan(/.{2}/).join('/')
end
First of all, I’ve used OpenSSL’s MD5 algorithm because it’s supposed to be much faster than the MD5 in Ruby. Next, the string passed to OpenSSL’s MD5 algorithm can be anything you want; the important part is that you include the id you pass into the function. That way, each hash generated will be unique and give a unique path to a particular stamp’s cache files. The last line of the function does two things:
  1. scan(/.{2}/) breaks apart the hash using RegEx into an array with 16 elements, each containing 1 byte of data (i.e. 0×55, 0×47, etc.)
  2. join('/')then iterates through the array output by scan, joining each element with a forward slash
Voila! You’ve now got the path to your cache files for a particular stamp’s id number.
If you’re using Rails, you can generate a fragment cache by wrapping your view code like so:
<% cache('stamps/' + get_cache_path(params[:id].to_i) + '/main_content') do -%>
[Your stamp page's main content here!]
<% end -%>
And you can expire the cache in a sweeper – after, say, updating a stamp – like so:
def after_update(stamp)
cachepath = get_cache_path(stamp.id)
expire_fragment("stamps/#{cachepath}/main_content")
end
The only problem with this scheme is if you need to manually delete some cache files for a particular stamp. In that case, you’ll have to manually generate the MD5 hash from the stamp id (or whatever string you used in your get_cache_path method) and then navigate through the 16 levels of subdirectories to find your desired cache files. Obviously, if this happens to you often enough, it might not be a bad idea to create an administrative function that will do all the hard work for you!
Have fun!
UPDATE: One thing I just noticed is that since each cache file is stored in 16 nested subdirectories, and each subdirectory takes up 4kB on disk, you have to remember that a 100kB cache file will now take up 100kB + (16 x 4kB) = 164kB of disk space. That’s not a huge problem with modern storage systems, but it is something to keep in mind if one day you start to run low on disk space…
Another thing to keep in mind is that MD5 is rather processor-intensive – especially in Ruby! If you don’t have a super-powered server and/or your caching scheme is serving up thousands of pages, you may very well have a whole load of MD5 computations bringing your server to a screeching halt. One way around this is to compute the MD5 when each cache file is generated, but not when the cache file is viewed. This will depend entirely on your app. The important point is that how you implement your caching scheme can make a huge difference in server load.

Linux Tips and Tricks, Part 2

Hello there! If you are new here, you might want to subscribe to the RSS feed to receive updates.
LinuxClick here to read Part 1!
I’m going to assume that you know how to do some basic stuff in Linux. In other words, if you don’t know what a command line is, or how to traverse directories, this might not help you much.
I should also note that my preferred flavor of Linux is Ubuntu. These commands will work on Ubuntu, but I can’t make any guarantees for other distributions. Best to just try them out and see what happens!
Without further ado, here are some more of the top linux tips and tricks that I have gathered over the years…

Show current Ubuntu version:
lsb_release -a
Count number of files in the current directory:
ls -1 | wc -l
Find files edited in last 1 day in the current directory:
find ./ -ctime -1 -print
Empty a file’s contents of all but the last 5 lines:
tail -5 file.nam > file.nam
Truncate a file to zero length:
:>filename
Show version/dependency info for a given [package name]:
dpkg -s [package name]/mysql
See what installed packages still have stuff pointing to a location such as /etc/mysql:
dpkg -S etc/mysql
Set time, data, and timezone:
Set the time zone:
dpkg-reconfigure tzdata
Set time/date with 24-hour HH value:
date MMDDHHMMYYYY.SS
Sync hardware clock to system clock:
hwclock --utc --systohc
Get drive info:
fdisk -l
hdparm -i /dev/sda
(substitute /dev/XXX for /dev/sda)
Show partition info (UUID, TYPE, etc.):
blkid
That’s it for this round. Have fun!

Linux Tips and Tricks, Part 1

Hello there! If you are new here, you might want to subscribe to the RSS feed to receive updates.
LinuxI’m going to assume that you know how to do some basic stuff in Linux. In other words, if you don’t know what a command line is, or how to traverse directories, this might not help you much.
I should also note that my preferred flavor of Linux is Ubuntu. These commands will work on Ubuntu, but I can’t make any guarantees for other distributions. Best to just try them out and see what happens!
Without further ado, here are some of the top linux tips and tricks that I have gathered over the years…
Avoid typing “sudo” in front of every command you want to run as root:
sudo -i
Add a new user account named “Bert”:
adduser Bert
Add group www-data as Bert’s secondary user group:
usermod -a -G www-data Bert
Make Bert’s primary user group www-data:
usermod -g www-data Bert
Delete Bert:
deluser Bert
Delete Bert and his home directory:
deluser --remove-home Bert
Delete Bert and all files owned by him:
deluser --remove-all-files Bert
Show size of all files and subdirectories of the current working directory:
du -sh
Show drive/partition space usage:
df -T -h
Empty a log file except for the last 5 lines:
tail -5 error.log > error.log
gzip the current directory with all subdirectories and files:
tar czvf /abc/123/backup.tar.gz .
Extract gzipped file into current directory:
tar xzvf file.tar.gz
Extract a tar file into the current directory:
tar xvf backup.tar
Generate a self-signed 1-year SSL certificate for HTTPS:
openssl req -new -newkey rsa:1024 -keyout hostkey.pem -nodes -out hostcsr.pem
(for "Common Name", use the web site's URI)
openssl req -x509 -days 365 -in hostcsr.pem -key hostkey.pem -out hostcert.pem
Dump a MySQL database to a file “sql.dump”:
mysqldump –-user USERNAME –-password=PASSWORD --opt DBNAME > sql.dump
Set your ethernet port to have a static IP address of 192.168.0.15:
Edit /etc/network/interfaces (NOTE: your ethernet may not be "eth0"!!):
auto eth0
iface eth0 inet static
address 192.168.0.15
netmask 255.255.255.0
network 192.168.0.0
broadcast 192.168.0.255
gateway [GATEWAY_IP]
dns-nameservers [DNS1_IP] [DNS2_IP]
Then run: /etc/init.d/networking restart
Eliminate the long lag between the “login:” and “password:” prompts when you SSH in to your server:
Add "UseDNS no" to the end of /etc/ssh/sshd_config
And, last but not least…
List all PCI devices present in your system:
lspci
List all USB devices connected to your system:
lsusb
Get your computer’s detailed hardware specs:
lshw
lshw -html > your-file-name.html
That’s it for this part. Stay tuned for more!

Click here to read Part 2!

Wednesday, February 1, 2012

View Detailed System Information In Ubuntu With i-Nex

When trying to determine the hardware specifications for your computer, it is not desirable to open the hardware casing, which, in some cases, can lead to loosing your warranty claim (e.g., in the case of laptops). In such a scenario, one can use some handy tools for determining the installed hardware specifications. i-Nex is one such tool that provides detailed hardware information within a Graphical User Interface (GUI) for Ubuntu. Read on past the break to find out more about this handy tool.
i-Nex is written in Gambas, which is, “A Graphical Development Environment based on a basic Interpreter, with object extensions.” The program works pretty much like CPU-Z. i-Nex comes separated in numerous tabs, with each tab providing information regarding a specific system component. As visible from the screenshot below, you can get detailed information about the CPU, Motherboard/BIOS, Sound and Graphics card, as well as other components such as the Kernel, Memory, Network etc, by clicking the respective tabs. To move across tabs, use the left/right arrow buttons. i-Nex is capable of displaying precise information about a system, including the manufacturer’s name, model number, processors cache information, hard drive sectors, RAM information (total, used, free, shared, buffers, cached and swapped), host name of the system, operating system version, time zone (being used), and more.
i-Nex application
You can also check out similar Ubuntu tools for listing hardware information, including HardInfo and dmidecode. You may install i-Nex for your Ubuntu version, from the packages available at Launchpad. The packages are available for all latest Ubuntu versions, including Oneiric Ocelot and Precise Pangolin.
Download i-Nex

Nanoshot: Capture & Upload Screenshots To Cloud In Ubuntu

In a previous post, we showed you three different ways of capturing screenshots in Ubuntu and later reviewed, Lookit, which is a handy screenshot capturing utility for Ubuntu, which enables uploading captured screenshots to the cloud. Recently, we found another handy screenshot taking application for Ubuntu, known as Nanoshot. It provides users with the utility to capture screenshots to upload them to cloud services like Flickr, and to grab screens from specific elements such as a video frame or the Unity Launcher.
You can install Nanoshot by entering the following commands in Terminal. While its compatibility with the raw build of Precise Pangolin is unknown, we successfully tested it in Ubuntu 11.10 Oneiric Ocelot and the below PPA works with earlier Ubuntu versions, including Lucid, Karmic, Maverick (as specified by the developer) and probably Natty, as well. You can get a list of dependencies for older versions here. The reason I have labeled Natty as a probable supported version, is because we did not test Nanoshot on it, but it worked fine in Oneiric (during testing).
sudo add-apt-repository ppa:nanoshot/ppa
sudo apt-get update
sudo apt-get install nanoshot
Once installed, launch and select options from the app-indicator menu. You can capture the entire desktop, the current window, a selected desktop area, a webpage, a media player, add cursor in screenshot, select a time delay for capturing screenshots, enable auto-run for Nanshot and select a video file for capturing screenshots via the app-indicator menu.
Screenshot
If you wish to capture video frames, then you will have to specify a video file and select the number of frames that are to be captured, as well as the output directory. You can also pick videos from recently viewed video files.
frames
When capturing a selected area, select an area and hit Enter to save the screenshot.
Screenshot Capture
Captured screenshots can be uploaded to Flickr, ImgUR or ImageShack, or saved to a local directory.
Upload to cloud
You can download the package for Nanoshot from the links given below.
Download Nanoshot
Download Nanoshot [Fedora and Tarball Source Package]
[via WML Cloud]

Monday, January 30, 2012

Mounty: Mount Disc Images via App-Indicator Menu Applet In Ubuntu Linux


We previously covered an Ubuntu disc mounting tool known as Furius ISO Mount, which mounts virtual discs and provides options for performing checksums to check the integrity of disc images. While Furius ISO Mount is quite an advanced disc mounting tool, one can always benefit from a minimalist disc mounting utility that works from the app-indicator menu. Mounty is one such disc mounting utility, which enables sharing virtual disc images. After installation, Mounty sits in the system tray and provides easy disc mounting options via the app-indicator menu.
Ubuntu users can install Mounty by entering the following command in Terminal:
sudo add-apt-repository ppa:kokoto-java/omgubuntu-stuff
  sudo apt-get update && sudo apt-get install mounty
When launched, you can mount a disc image via the app-indicator menu applet. To mount a virtual disc image, click Open disk image option and select your virtual disc. You can also enable the Remember mounted images option to make sure that recently opened virtual disc images are auto mounted for quick viewing. You can also load Mounty at system start up by selecting Load at startup option.
Disc Image
When a disc is mounted, a bubble message alerts you that the image has been added to Mounty. You can open the content of the mounted disc image to explore the files inside it. Mounted discs can be ejected anytime and reloaded when required.
Fedora
What makes Mounty quite handy is the fact that it does not consume a lot of the desktop space and provides a minimalist menu for quickly mounting/auto mounting and ejecting disc images. Furthermore, its ability to remember recently opened disc images makes it even more useful, as compared to other applications of its kind. It is also worth mentioning here that Mounty additionally supports the ability to load (disc) image files from your file manager. You can grab the source code and submit bug reports of this application at Launchpad.
Mounty at Launchpad

Red Hat 6 Installation Guide – RHEL 6 Install Screenshots

https://blogger.googleusercontent.com/img/b/R29vZ2xl/AVvXsEhznMYYy-MMjW1llU56uxLwAX99eDPZUjciqtnzXTOLbHV-3DDnjatWSWYlgdZRZpdWlYky4CPED8VKb4QMDAVPTCl6Vr6XmlxrXDWbwP_cnby_pdNooVRWT3Qjx6z_VDxT2QoJdUNIkyDp/s1600/redhat-logo.jpg
This is Red Hat 6 RHEL (Red Hat Enterprise Linux) installation guide, step-by-step walkthrough with screenshots. Current version of Red Hat 6 is Beta, but also this RHEL 6 Beta version looks very stable and good OS, so that’s why I decided to write this RHEL 6 Installation guide.

The Red Hat Enterprise Linux 6 Beta is available on the following architectures:

  • i386
  • AMD64/Intel64
  • System z
  • IBM Power (64-bit)
Download Red Hat 6 Beta DVD images here.

Some of the many improvements and new features that are included in Red Hat Enterprise Linux 6

  • Power management – tickless kernel and improvements through the application stack to reduce wakeups, power consumption measurement by Powertop, Power Management (ASPM, ALPM), and adaptive system tuning by Tuned, all enhance more efficient system power usage.
  • Next generation networking – comprehensive IPv6 support (NFS 4, CIFS, mobile support [RFC 3775], ISATAP support), FCoE, iSCSI, and a new and improved mac 802.11 wireless stack.
  • Scalable filesystems – ext4 file system provides support for larger file sizes and significantly reduces repair times over ext3. XFS® is a high-performance file system that supports extremely large files and is optimized for large data transfers.
  • Virtualization – KVM includes performance improvements and new features, sVirt protects the guest and host from unauthorized access, SR-IOV and NPIV deliver high-performance virtual use of physical devices, and libvirt leverages kernel resource management functionality.
  • Enterprise security enhancement – SELinux includes improved ease of use, application sandboxing, and significantly increased coverage of system services, while SSSD provides unified access to identity and authentication services as well as caching for off-line use.
  • Development and runtime support – SystemTap improvements, ABRT is a new framework for simple collection and reporting of bug information, and improvements are made to GCC (version 4.4.3), glibc (version 2.11.1), and GDB (version 7.0.1).
On this guide I use Graphical Installer. There is also Kickstart automated installation method and Text-based Installer available. And I install this machine for Software Development Workstation and testing environment. So package selection is following: Desktop, Web server, Databases, Compiling tools, Java. Same method works also for servers, normal desktops and other setups, but of course different software selection. So let’s begin installation…

Burn Downloaded Image to DVD and Boot Computer Using Red Hat 6 Installation DVD

Check RHEL image MD5 sum and burn image to DVD with your favourite CD/DVD burner. And boot computer using Red Hat Installation DVD.


Red Hat 6 RHEL Installation

Read carefully and perform following steps to Install Red Hat Enterprise Linux 6.

Step:1-First of all select DVD as your First Boot Device. Save & Exit From BIOS and Reboot your System.
 
Step:2-After Booting from DVD you will get below screen. Select Install or Upgrade an Existing System and press Enter
 
Step:3-If you get following screen wait for some time for Anaconda to take you for the next step.

Step:4-Select your prefered Language from Below Screen. I prefer English is good for all so i have selected English Language for Tutorial Purpose.

Step:5-Select Keyboard Layout.

Step:6-In Following Screen you will able to see 4 Installation Methods, Let me explain Methods here:-
  • Local CD/DVD – It is obvious that If you use CD/DVD media then Choose this option.
  • Hard Drive – Select this if you have dumped your source into any other Linux partition.
  • NFS Directory – Select this If you have shared installation source shared using NFS.
  • URL – Select this if you want to install using FTP or HTTP Source link.
So For this tutorial and Step by step installation of RHEL 6 we will select Local CD/DVD Installation Method.

Step:7-If you are not sure about your media then Select OK to verify else Select Skip.

Step:8-If your media is fine till now it will take you to the Graphical
Installation Screen
of RHEL 6 Installation. please wait for few minutes
after getting following screen

 
Step:9-Following is the first screen after Getting GUI Installation Wizard Click on NEXT to Continue…


Step:10-Because we are installating Beta Release of Red Hat Enterprise
Linux you will get warning of pre-release version. Have a look at
following screen….


 Step:11-Now, For installating RHEL there is two storage options are available Let me explain bit…..
  • Basic Storage Devices – Select this if you are installating on Local Hard disk or some local Storage
  • Specialized Storage Devices -  Select this if you are installing on SAN ( Storage Area Network ) or DASD ( Direct Access Storage Devices) 


 Step:12-Don’t worry if you don’t get following step, because if your Hard disk is blank then only you will get following screen.

 Step:13-Set your Hostname here. Remember FQDN hostname is always preferable (i.e. tejasbarot.ask4itsolutions.com)

 Step:14-If you want to configure network during installation then click on Configure Network and Configure your Network by Editing Ethernet Cards.


 Step:15-Now It’s time to Select Time Zone.

 Step:16-Now Set your root Password.
 Step:17-Make sure your password is not combination of
dictionary words other wise you’ll get screen as below.

 Step:18-Now We reach to the most Important part of any Linux Installation, Its Partition time guys…………Not explaining any option because it is already nicely explained there on screen itself. I prefer Create Custom Layout because i can show you guys how to make partition during installation. If you have windows already installed then please select this option……………………Select Create Custom Layout and  click on NEXT.

 Step:19-I have got blank Hard Disk, So If you have also got Blank Hard Disk then you will get screen like below :-

 Step:20-Here we’ll create only Three Most required Partitions….. You can create as per your requirement. SoNow Let’s start creating Partitions……..
 Step:21-Let’s create boot partition first. Click on Create -> Select Standard Partition, Enter /boot as Mount Point, Enter Size 500MB, and Keep all information as it is, Click on OK. 

 Step:22-Now Let’s create swap partition Click on Create -> Select Standard Partition, Select Swap as File system Type, Enter size 2000 ( I suggest it should be double than RAM) and Keep all information as it is, Click on OK. 


 Step:23-Let’s create root partition. Click on Create -> Select Standard Partition, Enter / as Mount Point, Select Fill to maximum allowable size and Keep all information as it is, Click on OK.

 Step:24-Now If everything is perfectly fine then you will able to see following screen

 Step:25-This is the screen which is going to Format all your partition which you have created,
Here if you are not sure then reboot your system without clicking on
any thing. If you are sure that you want to continue then click on Write Changes to disk.

 Step:26-Here is the Boot Menu screen. You can set password for Grub here, You can modify booting entry here.

 Step:27-Different Kinds of Software packages are availabe so Select as per your requirement and click on NEXT. 

 Step:28-If you plan to do customize installation then click on Customize Now and Click NEXT and Select your required packages and then click Next. 

 Step:29-Installation has been started. Just get back and Relax for some time. It will take some time to get installed.


 Step:30-Congratulations Guys….. Your RHEL 6 is installed…….

 Step:31-Grub Screen of Red Hat Enterprise Linux 6 Beta ( RHEL 6)

 Step:32-Wait…………. RHEL 6 Beta is Loading………………………

 Step:33-First Boot Instructions…. Just Few Steps and That’s It.

 Step:34-This is the Welcome Message click on Forward 


 Step:35-Select Yes, I agree to the License Agreement and Click on Forward 

 Step:36-If you have RHN Login then Select Yes Otherwise Select No, I prefer to register at a later time and click on Forward.

 Step:37-Create Normal User and Click Forward 

 Step:38-Set your Date & Time Here.

 Step:39-Enable Kdump if you want to configure otherwise Click on Forward, That’s It.

 Step:40-Now It’s your RHEL 6 is installed and running.
Have a Fun with Red Hat Enterprise Linux 6 | RHEL 6 Beta.